Welcome to Moda Fabrics!
Dancing Colors Quilt
Dancing Colors Quilt
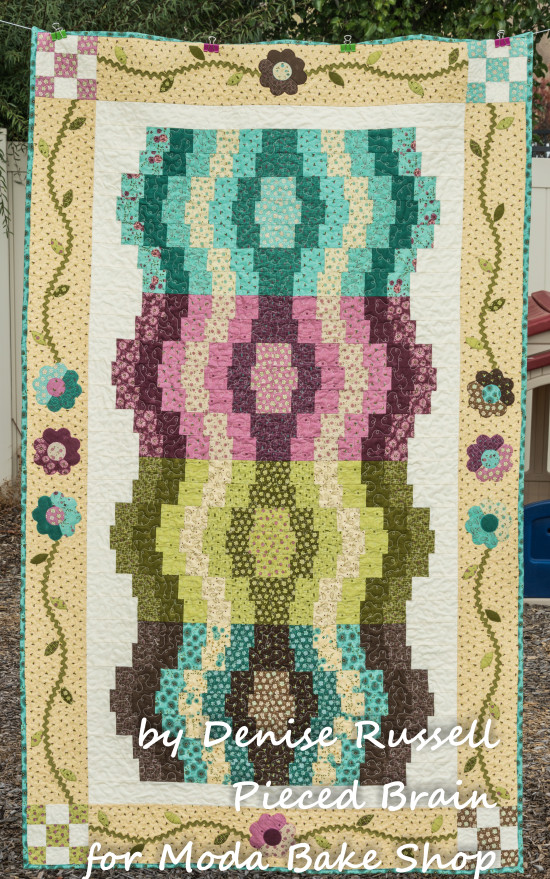
"Dancing Colors" features the gorgeous line "Prints Charming" by Sandy Gervais for Moda. The wavy design of the quilt center is complemented by the movement of the vines on the border. Using a Jelly Roll® speeds up the process allowing you to piece this top over the weekend. Pick your favorite Jelly Roll® and get started! Then, head over to my blog at http://www.piecedbrain.com for more inspiration!
This quilt finishes at 43" x 72".
1 Jelly Roll® {Prints Charming by Sandy Gervais}
3/4 yards neutral solid background fabric
1-1/4 yards border fabric
3 yards backing fabric
1/2 yard binding fabric
Batting to size
1 yard fusible web
6 yards green 3/4" ric-rac
scraps of green fabric for leaves
template plastic
matching thread for applique'
Aurifil 50 wt for piecing
Basic sewing supplies
CUTTING
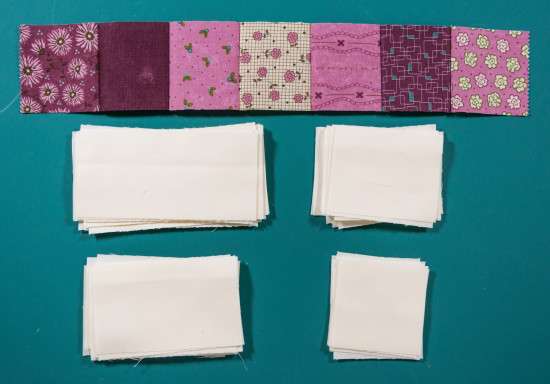
From background fabric, cut (2) 2-1/2" x 33" strips and (6) 2-1/2" x WOF strips. From the (6) strips cut:
- (16) 2-1/2" x 5" rectangles
- (16) 2-1/2" x 4-1/2" rectangles
- (16) 2-1/2" x 3" rectangles
- (8) 2-1/2" x 2" rectangles
- (16) 2-1/2" x 2-1/2" squares (for 9 patches)
From border fabric, cut (6) 6-1/2" x WOF strips
From ric-rac, cut (4) 16" pieces and (4) 26" pieces
From binding fabric, cut (6) 2-1/2" x WOF strips
PIECING
Stratas (strip sets)
Select strips from the Jelly Roll® to make 4 stratas, each one with 7 strips. The 7th strip is the fabric that will be in the center of the wave design. Notice how I alternated dark and light prints to enhance the wave design. Stitch 7 strips together for each strata, press seams to one direction (press all stratas in the same direction). Cut first strata into (14) 2-1/2" multicolor strips. Repeat with the other 3 stratas.
The waves are stitched one color group at a time, beginning with the middle row. Gather one color set of 14 strips cut in the step above stacking them with fabrics in the same direction, as well as the rectangles of background fabric which will be stitched to both ends of each row.
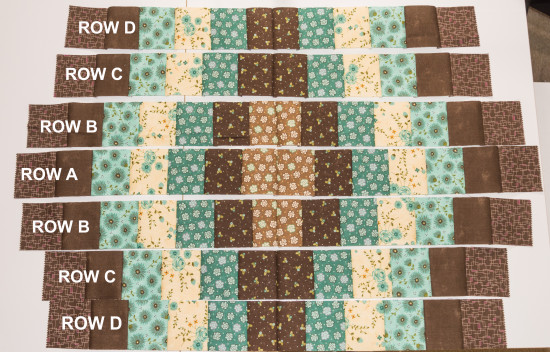
Row A: join two strips, making sure center squares are of the same fabric. Add one 2-1/2" x 2" rectangle of background fabric to each end, and press new seams.
Rows B: take two strips, trim off 1/2" from squares that will be at the center of the row, and stitch them together. Add one 2-1/2" x 3" rectangle of background fabric to each end of the row. Repeat with next two strips for second row B. Press new seams.
Rows C: take two strips, remove last square (same fabric) from both strips (do not discard them!), and stitch them together. As you can see on picture above, I removed the light brown squares from both strips so now the dark brown ones are stitched together. Add one 2-1/2" x 4-1/2" rectangle of background fabric to each end. Repeat with next two strips for second row C. Press new seams.
Rows D: take two strips, remove last square from both strips, trim off 1/2" from squares that will be at the center of the row, and stitch them together. Add one 2-1/2" x 5" rectangle of background fabric to each end. Repeat with next two strips for second row D. Press new seams.
Pin and stitch one Row B to the top and one Row B to the bottom of Row A (The only seams that will need to nest are the middle ones. Yeah!). Stitch one Row C to the top and one Row C to the bottom. Finally, stitch one Row D to the top and one Row D to the bottom. Press seams. Repeat for remaining 3 color groups. Stitch 'waves' together and add one 2-1/2" x 33" strip of background fabric to the top and one to the bottom of quilt center.
9-Patches
Separate by color the squares you removed from the strips: make four color groups, each with 5 squares. Using the (16) 2-1/2" x 2-1/2" squares of solid background fabric, stitch 9-patches together: For the top and bottom rows, stitch a print square to a solid fabric square, then add another print square to the other edge of the solid square. Set aside. For the middle row, stitch one background fabric square to each side of a print square. Press rows. Stitch them together. Repeat to make a total of (4) 9-patches.
Borders
Download applique' template by clicking here or find it at the end of the Printer Friendly file at the end of this post. Press fusible web onto back of remaining pieces of each strata. Trace leaf, circle and flower shapes onto template plastic (including traced line in middle of flower). Cut around shapes using sharp scissors. Place first strata onto a lightbox (or window) with fusible web facing you. Trace flowers by aligning traced line on template with seam line between two different strips of fabric. Repeat to make 8 flowers. Trace 8 circle shapes onto remainder of stratas. Trace 40 leaves onto smooth side of fusible web, cut about 1/8" outside the traced lines, and press them to the wrong side of the green fabric scraps. Cut all shapes, peel fusible web paper and set aside.
Take 2 border strips and cut them to 33". Stitch one 9-patch to each end of both strips to form top and bottom borders. Press. Fold these borders in half to mark center. Referring to quilt picture above, position one flower and circle on center, pin one 16" length of ric-rac to each side (rip a few stitches off between border and 9-patches so you can thread ric-rac through seam and re-stitch it, hiding end of ric-rac; hide other end under flower), arrange leaves around ric-rac and fuse all shapes to border. Repeat for bottom and side borders.
With green thread, stitch ric-rac onto border by following its zigzag shape. Using blanket stitch and matching thread, applique' flowers, circles, and leaves onto border.
Assemble Quilt
Stitch side borders to quilt center. Stitch top and bottom borders and press seams. Make a quilt sandwich with backing and batting and quilt as desired. I used monofilament to stitch ric-rac again, to ensure its edges where securely attached to quilt).
Stitch binding strips together, fold them in half lengthwise and press. Stitch binding to quilt front, fold it towards back of quilt and hand stitch binding to backing. Alternatively, stitch binding to quilt back, fold it towards the front of quilt and machine stitch binding.
This quilt finishes at 43" x 72".
I hope you enjoy this design. Imagine all the possible color combinations using the many Moda Jelly Rolls® available! I already have a more masculine version in mind because one of my sons loved "Dancing Colors" and wants his own. In the meantime, check out what I am up to at piecedbrain.com, follow Pieced Brain on Pinterest, Twitter (@piecedbrain), and on Instagram!
Denise Russell
{www.piecedbrain.com}


